česky | english
How to install a e-mail certificate in Thunderbird?
Let´s do it step by step:
Last updated for Thunderbird version 2.0.0.6. Instruction for Thunderbird v2.0.0.14 is now added. Instructions for using Thunderbird with Firefox added.
First: Download the CAcert Root Certificates
Open http://www.cacert.org/index.php?id=3 in your browser.
Right-click on "Root Certificate (PEM Format)", and "Save as" to a local file. (Do this for both the class1 and class3 root certificates)
Second: Import the root certificates into Thunderbird
Importing of the root certificates into thunderburd can be done via the Authorities tab of the "Certificate Manager" of thunderbird. There are several ways to open the "Certificate Manager":
via the View certificates Button of the Security page of the Account Settings. (Edit, Account settings.)
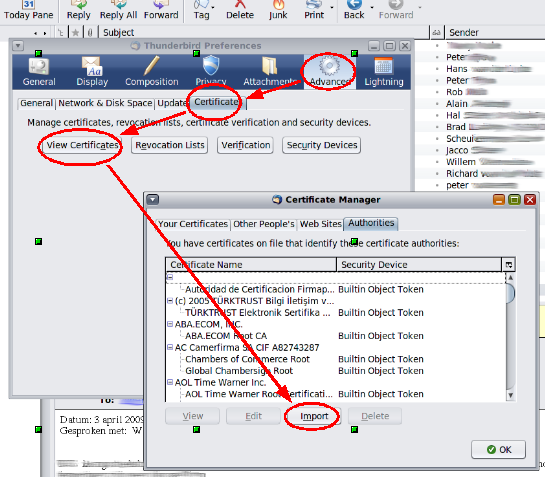
via the View Certificates Button on the Certificates tab of the Advanced preferences (Edit, Preferences....)
As the location of the certificate management configuration has changed considerably for various thunderbird versions, Instructions are given for thunderbird 2.0.0.6, 2.0.0.14 and 2.0.0.18. The example images are for 2.0.0.18.
|
Thunderbird 2.0.0.6: Tools, Account Settings, Security, Manage Certificates, Authorities. Then select Import, and select the previously saved files of the root certificates. If you use Thunderbird version 2.0.0.6, follow these instructions. Select Tools > Account Settings. Then click 'security' in the menu on the left of the Account Settings window. Next, click the 'Authorities' tab in the Certificate Manager window. Next, click import. |
Thunderbird 2.0.0.14: Tools, Options, Advanced, Certificates, View Certificates, Certificate Manager, Authorities, Import. Browse the previously saved files of the root CAcert certificate root_X0F.crt |
|
Thunderbird 2.0.0.18: Edit,Preferences...,Advanced,View Certificates,Authorities,Import. Select the certificate you've just downloaded and import. Repeat this so that both certificates are imported. |
|
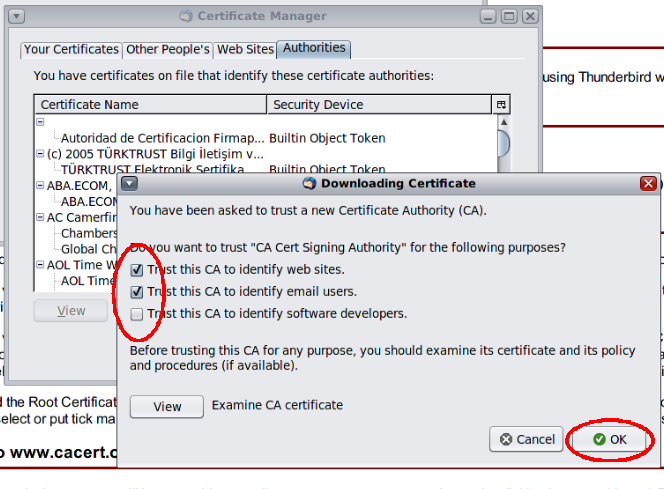
With every root-certificate you import, you'll be asked for what you'd like the certificate to be trusted. For both certificates, select "Trust this CA to identify websites" and "Trust this CA to indentify email users. |
|
If you already imported the Root Certificates before into Firefox, Thunderbird will claim that they are already imported. They are not trusted however! So search for "Root CA" as above and choose ?"edit"? ("Bearbeiten" in german version) and select or put a tick mark next to "Trust this CA to identify email users" "Trust this CA to identify web sites" option. |
|
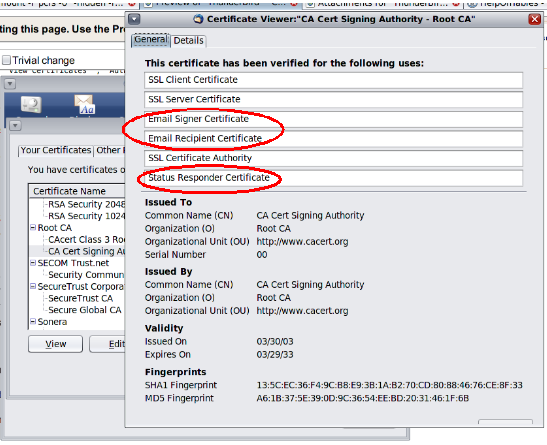
You can always verify the settings you've done for these certificates by selecing the "Root CA" "CA Cert Signing Authority". Check that the certificate has been verified as "Email signer certificate", "Email Recipient certificate" and "Status responder certificate". These uses correspond to the "Trust this CA to identify mail users" option you selected previously. The remaining three SSL-type certificates correspond to the "trust this CA to identify web sites" option. |
Third: go back to www.cacert.org and login:
Next, you'll need to create personal certificates. Login to your account at www.cacert.org and verify that the email-account you intend to secure with certificates exists in the email accounts you have added. (+Email Accounts, View). If the email-address is not listed, add it now. The form is very straightforward: Just enter an email-address, check the email at that account and respond to cacert.org's ping-email. Now, move over to the Client Certificates section and select Add to create a certificate. Select the email account you're creating the certificate for, by which class of root certificate it should be signed and decide if you want to include your name. Using this certificate to logon to the cacert.org website and or for SSO can be selected as well here but are optional. Click the Next button to continue. If you're using firefox to follow the instructions, your certificate should import automatically to firefox. If the certificate is not imported, do the following: Go to +Client Certificates, View and click the appropriate certificate. A page will appear with a link which allow you to install the certificate. If all is well, the certificate will be imported into firefox: As the certificate is valid in firefox as well, firefox can use the certificate as well. As per the recommendations: Generate certificates signed by both class 1 and class 3 root certificates.
Fourth: Transfer the certificate from firefox to thunderbird.
In Firefox, open the certificate manager. choose Tools, Options, Advanced, View Certificates Select the Your Certificates tab. You should see your own certificates there. Select the appropriate certiface, select Backup, choose a good password to encrypt the backup, and save it to a local file, which has a ".p12" ending (e.g. Backup.p12). Do this for both the level 1 and the level 3 certificate and make sure they are saved to different filenames. Open Thunderbird's Certificate Manager (See instructions earlier on this page on how to do this). Click the Your Certificates tab then choose Import. Open the backup file you saved previously in Firefox, and enter the password you secured it with. You may have to enter two sets of passwords here. Import both certificates.
Fifth: Link the Certificate to your Identity
|
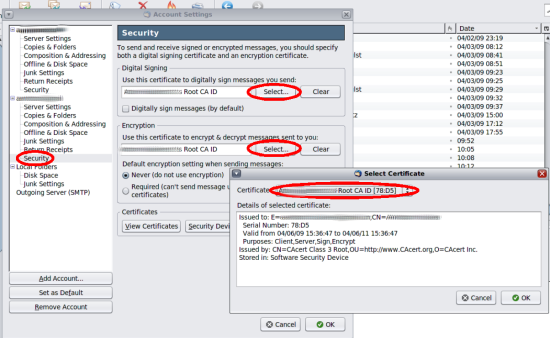
You should now see the certificate in the certificate management window of Thunderbird. As a final step, it is necessary to link the certificate to your identity, so that ThunderBird knows with which key it will sign the emails you want to send. Select the account you'd like to secure Via: Edit, Account Settings and select the security section of the email account that you want to apply the certificate to. Click Select and select the CAcert certificate. Do this digital signing and for encryption. Note that you can set the default for signing and securing on this page as well. Also note that the email address of the default identity for the account must match the email address in your certificate. If it does not then Thunderbird will refuse to sign your email with the message: You need to set up one or more personal certificates before you can use this security feature. It will do this even if you attempt to sign an alternate identity that does match. |
Sixth and Last: Send secure signed encrypted emails
When you write an email, you can select the 'digitally sign this message' and/or 'encrypt this message' items shown under the security button. If you enable "Headers" area (View > Headers > All), you will see there an envelop with red seal or dot, which is indicating that the email was Digitally signed. If you see a picture of Lock next to the picture of the envelop then that indicating the email was encrypted also.
Related Information
Email Certificates ../EmailCertificates
Thunderbird Advanced Configuration ../ThunderBirdAdvancedConfig


